So, as you can see, the previous post on this blog was from 2011. I moved on from designing lucky star strips to pursue other interests. As I was going through old things on the web today, to my great surprise I noticed that this blog was still getting views! And quite a few of them too! People had also continued to request new designs. This post is to let you know that I appreciate your enthusiasm, but I am not filling any more requests, nor have I filled any in the past 2 years (in fact the majority of my posts was in 2009! How long ago is that?!).
I hope you still enjoy browsing the post archive and downloading the designs that are here.
PS: If you are interested in designing your own paper strips, you might have a look at this old post on how I used to make them. I'm sure you could also use different methods, like designing them entirely on the computer.
Wednesday, February 27, 2013

Monday, January 17, 2011

Friday, November 19, 2010

Friday, January 8, 2010
Snoflakes

I found this nifty snowflake generator, and put all the pretty snowflakes on a sheet of origami star strips. Download it here.

Monday, December 14, 2009
Design your own - How I do this
What you need:
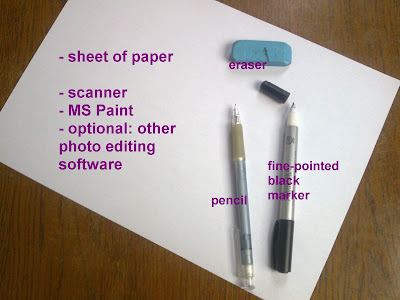
STEP 1: After you've gathered your supplies, fold the sheet of paper in half lengthwise. Imagine it to be a supersized folding strip, and get an idea of where you want your designs to go. Then you're ready to start doodling with your pencil. As you can see this is sketch is of one of the christmas designs from my previous post.

STEP 2: Doodle and sketch until you are happy with the design. When you are, trace the final lines with you marker/pen. Make sure it's as smooth as possible.

STEP 3: Erase the sketch. You won't need the pencil lines anymore, so erase them. Your design will now look all cleaned up.

STEP 4: Make it digital. The following is not so easy to show in images, so follow these steps very carefully.
- Scan and save your design.
- Open the image in Paint.
- Click File -> Save As, and select 'Monochrome Bitmap' as the format. Click Save. Click OK if it tells you that doing this will screw up the colors, screwing up the colors is exactly what we want.
- Select all (Ctrl+A).
- Copy (Ctrl+C).
- Open a new blank paint file.
- Paste (Ctrl+V). You need to do all this copying and pasting because the monochrome file will no longer accept color, and we do want to put color back into the design later.
- Save. This is the new file that we'll be working from.
Now it's time to clean up the image. Select the pencil and zoom in. Remove any stray pixels and smooth out the lines a little. Pay special attention to whether the bits of your design that you are going to color in are properly closed off. You wouldn't want to flood fill the entire image.
- Scan and save your design.
- Open the image in Paint.
- Click File -> Save As, and select 'Monochrome Bitmap' as the format. Click Save. Click OK if it tells you that doing this will screw up the colors, screwing up the colors is exactly what we want.
- Select all (Ctrl+A).
- Copy (Ctrl+C).
- Open a new blank paint file.
- Paste (Ctrl+V). You need to do all this copying and pasting because the monochrome file will no longer accept color, and we do want to put color back into the design later.
- Save. This is the new file that we'll be working from.
Now it's time to clean up the image. Select the pencil and zoom in. Remove any stray pixels and smooth out the lines a little. Pay special attention to whether the bits of your design that you are going to color in are properly closed off. You wouldn't want to flood fill the entire image.

STEP 5: DONE. Or at least, if you wanted a black and white only design, your image is now finished and you can skip to step 7. If you want color, keep reading.
Note: you may want to do some cropping or rearranging of the design so that it will look nice one under the other. You'll understand when you look at step 7.
Note: you may want to do some cropping or rearranging of the design so that it will look nice one under the other. You'll understand when you look at step 7.

STEP 6: Color! You can now use Paint or other software to give the image all the color you want. Here I used paint to flood fill the items, and later I used Gimp (photoshop for cheapskates) to add a shaded background

STEP 7: Now we're going to get all of this onto a printable sheet. I usually do this in Word but I bet there are other programs that do this. Make a table of 20 columns and 1 row. Make sure they cover most of the page and use the right-click option that distributes the columns evenly to get them all the same size. You can leave them like this or make the lines grey and dotted so that they will not show up on the stars as much.
Paste the finished image into the first column. Right-click it and change its width to around 1 cm. To be accurate about this, check out the column width in the table settings, and use this measurement for the width of the image. Copy the shrunken image, hit Enter, and paste it. Fill up about half of the column with your image. Then copy the 'stack' of design, and paste it into the other columns.
Paste the finished image into the first column. Right-click it and change its width to around 1 cm. To be accurate about this, check out the column width in the table settings, and use this measurement for the width of the image. Copy the shrunken image, hit Enter, and paste it. Fill up about half of the column with your image. Then copy the 'stack' of design, and paste it into the other columns.

STEP 8: Print! Your sheet is now ready to print. Well done :).
Optional: At this point I use CutePDF Writer to convert the whole thing into a .pdf file and upload it for your enjoyment.
Optional: At this point I use CutePDF Writer to convert the whole thing into a .pdf file and upload it for your enjoyment.
If any of this is not working out for you, feel free to leave a comment or send me a message and I'll see if I can be of any help.
Good luck! :)
Monday, December 7, 2009
Request: Christmas

Monday, November 30, 2009
Request: Girly
I just noticed some requests were posted, so here is a sheet of girly flowers and hearts in black and white for you :)

I'll get to work on the christmas-themed designs, so stay tuned.
Wednesday, September 16, 2009

Wednesday, August 19, 2009
I'm back...and so is this.

Retro origami stars, complete with clashing colors and pointless dots. Two combinations on one sheet, that you can download here.
Tuesday, July 21, 2009
The Ace of Spades
...and other cards.
Now you can print and fold origami stars with card suits on them :). Click here to download.
Now you can print and fold origami stars with card suits on them :). Click here to download.

Wednesday, July 1, 2009
Creative Project Episode 3 - Stop Printing.
Of course pre-made printable origami star designs are awesome (I wouldn't be making them if they weren't) but sometimes you want to give the printer a break, make something entirely new, or you just don't have one around for a while, like on the bus or at school. This post is about alternatives to printable star-folding-strips.
Design your own

The templates with just empty lines that I have on here aren't just for cutting lines on the back of continuous patterns. You can also use them to design your own strips. Just print a sheet of blank strips and get going with the crayons, paint, pens, glitter and everything else you ever wanted on an origami star.
I did this when I started out cutting my own strips, and it looked like this (the stars you see on the right) and this.
It was great fun to do, and you could end up with some interesting looking personalized origami stars.
 Recycle
I occasionally use old magazines and catalogs to fold stars from. They usually have lots of colors, and best of all, they are entirely free. Some flyers and magazines use really thin glossy paper that isn't too suitable to fold sturdy stars from, but after some experimenting you should have a feel for the kind of paper you can use. Just cut the page into strips, and there you are.
Design your own

The templates with just empty lines that I have on here aren't just for cutting lines on the back of continuous patterns. You can also use them to design your own strips. Just print a sheet of blank strips and get going with the crayons, paint, pens, glitter and everything else you ever wanted on an origami star.
I did this when I started out cutting my own strips, and it looked like this (the stars you see on the right) and this.
It was great fun to do, and you could end up with some interesting looking personalized origami stars.
 Recycle
I occasionally use old magazines and catalogs to fold stars from. They usually have lots of colors, and best of all, they are entirely free. Some flyers and magazines use really thin glossy paper that isn't too suitable to fold sturdy stars from, but after some experimenting you should have a feel for the kind of paper you can use. Just cut the page into strips, and there you are.
Monday, June 29, 2009

Friday, June 19, 2009
The Oval Portrait


I made you a poetry-inspired sheet today, with portraits of E.A. Poe and his raven (or maybe not HIS, but still a raven ;))
Quoth the Raven, 'Download here.'
Tuesday, June 16, 2009

Friday, June 12, 2009


Wednesday, May 27, 2009
YARRRRR

Aye, t'is a pirate sheet!
Piratey stars in white/red and black/red can be folded from the strips in this file.
UPDATE (29/5): now also in black and white (for white or colored paper) with stripes and without.
Monday, May 11, 2009
Like Colored Clockwork

Tuesday, May 5, 2009
Requests: Bugs & Ballet

Oh wow, I'm doing my first real round of requests!
Akasha's request:
Black & White ladybugs, I've got 'em for you here.
Abay's request:
I fixed you up a sheet of pointe shoes. Hope you like them :). Click here.
Wednesday, April 29, 2009


Subscribe to:
Posts (Atom)


 Posts
Posts


